Google Tag Manager
Data Layer Events and Variables
CookieHub provides a set of data layer events and variables that can be effectively utilized in Google Tag Manager to customize and control the behavior of your tags. These events and variables offer valuable insights into user consent and interactions with CookieHub.
Data Layer Events
- cookiehub_consent_update: This event is triggered whenever there is an update in consent mode types. It covers changes in consent settings, including when CookieHub is initially loaded to override defaults.
- cookiehub_ready: Triggered when CookieHub has fully loaded and is ready for use.
- cookiehub_modified: This event occurs when a user makes any changes to allowed or denied categories within CookieHub.
- cookiehub_necessary: Fired when the “Necessary” cookie category is allowed. This can happen because it was previously allowed or when a user enables it in the settings dialog or by clicking the “Allow all cookies” button.
- cookiehub_preferences: Triggered when the “Preferences” cookie category is allowed, under similar conditions as the “Necessary” category.
- cookiehub_analytics: This event is fired when the “Analytics” cookie category is allowed, based on the same criteria as the “Necessary” category.
- cookiehub_marketing: Triggered when the “Marketing” cookie category is allowed, following the same principles as the “Necessary” category.
- cookiehub_uncategorized: This event is fired when the “Uncategorized” cookie category is allowed, in alignment with the criteria for the “Necessary” category.
- cookiehub_click_allow_all: Triggered when a user clicks the “Allow all cookies” button.
- cookiehub_click_deny_all: This event occurs when a user clicks the “Deny all cookies” button.
- cookiehub_click_open_settings: Fired when a user clicks the settings icon or the “Cookie Settings” button.
- cookiehub_click_save: Triggered when a user clicks the “Save settings” button in the Cookie Settings dialog.
- cookiehub_click_learn_more: This event is triggered when a user clicks the “Learn more” link to access additional information.
- cookiehub_dialog: This event is triggered when the first layer consent dialog is shown.
- cookiehub_settings: This event is triggered when the settings dialog is shown.
- cookiehub_donotsell: This event is triggered when the IAB GPP/CCPA policy framework is active and a user opts-out of selling and sharing of personal data. This event is available in version >=2.8.2.
Data Layer Variables
The state of each cookie category is stored in data layer variables, enabling you to customize tag loading based on user selections. Here are the variables:
- cookiehub_necessary: A Boolean variable with a default value of “false.”
- cookiehub_preferences: A Boolean variable with a default value of “false.”
- cookiehub_analytics: A Boolean variable with a default value of “false.”
- cookiehub_marketing: A Boolean variable with a default value of “false.”
- cookiehub_uncategorized: A Boolean variable with a default value of “false.”
- cookiehub_allowsale: A Boolean variable set to false if the user has opted-out of selling and sharing of personal information. This variable is linked to the allow sale function when the IAB GPP/CCPA policy framework is in use. When other policy frameworks are in use, the value will return the consent state of the marketing category as fallback. This variable is available in version >=2.8.2.
These variables offer valuable insights into the user’s consent choices, allowing you to tailor your tag management in Google Tag Manager based on the specific preferences and interactions of your website visitors.
Customizing CookieHub Triggers
CookieHub offers various triggers that you can integrate into Google Tag Manager to control when your tags fire. Each use case may require different triggers to ensure tags are fired based on user interactions with the CookieHub dialog. Several factors and configurations can impact how these triggers work. Here’s a breakdown of these configurations and the available triggers:
Configurations Affecting Triggers
- Regional Consent Type (CookieHub): When multiple regions are specified in CookieHub, an asynchronous request is made to detect the user’s country. Google Tag Manager may have already evaluated triggers for tags, and if additional consent checks are required, they may not be automatically re-evaluated once the user’s country is detected. This setting can affect all firing triggers when multiple regions are specified and implied consent is used.
- Firing Triggers (Google Tag Manager): CookieHub provides various firing triggers, which can be used independently or in combination with other triggers to fire tags based on user interactions with the CookieHub dialog.
- Trigger Exceptions (Google Tag Manager): All CookieHub triggers can also be used as exceptions to prevent loading a tag when specific conditions are met.
- Additional Consent Checks (Google Tag Manager): When additional consent checks are configured for a tag, the specified consent category must be either explicitly or implicitly allowed before the tag is triggered. If multiple categories are specified, all of them must be allowed.
- Tag Firing Options (Google Tag Manager): These options determine how tags are evaluated with firing and exception triggers and whether a tag can trigger multiple times.
CookieHub Triggers
- CookieHub - Loaded: Triggered once per page when CookieHub is fully loaded and the user’s country is detected. For first-time users, the CookieHub dialog is shown, and depending on the consent type, cookie categories may or may not be allowed at this time.
- CookieHub - Consent Update: Triggered every time consent mode signals are sent. It’s activated after every interaction with the CookieHub dialog (Allow all, Deny all, or Save settings). It’s also triggered on each page load after CookieHub has determined the current consent settings for the user.
- CookieHub - Choice Modified: Triggered on every user interaction with the CookieHub dialog (Allow all, Deny all, or Save settings).
- CookieHub - Allowed Necessary, Preferences, Analytics, Marketing: Triggered when the corresponding cookie category is allowed. This can occur due to manual user interaction with the CookieHub, dialog settings, or based on default settings or stored consent preferences.
Tag Firing Options
- Once per page: The tag fires once on each page load, and if the consent group isn’t allowed at the time the trigger combination matches, the tag won’t be fired in that page load.
- Once per event (default): The tag fires every time the trigger combination matches. Depending on the setup, using this option may cause multiple instances of a tag to load.
- Unlimited: Tags fire whenever triggers indicate, primarily used with tag sequencing.
Choosing the Right Triggers
- Built-in consent mode Support: For tags with built-in consent mode support (e.g., Google Analytics, Conversion Linker, Floodlight, Google Ads Conversion Tracking, and Remarketing), special CookieHub triggers may not be needed. These tags respect consent mode and re-evaluate triggers when consent mode signals are received.
- Additional Consent Tags: For tags requiring additional consent, you can often use the “CookieHub - Consent Update” firing trigger. However, specific trigger combinations may be more suitable, depending on your requirements.
- Consider Firing Options: Be aware of how tag firing options affect trigger evaluations, especially for tags configured with additional consent. The chosen option can impact how often the tag is evaluated.
Please note that the “CookieHub - Consent Update” event is always triggered when CookieHub signals any update to consent mode settings. Be cautious when using “Once per page” with tags that depend on Consent Update, as the tag may not fire again, potentially causing these tags not to load at all.
Exclude CookieHub from certain pages
In certain cases, it may be necessary to exclude specific pages, such as privacy policy or legal disclaimers, from displaying the CookieHub dialog to allow users to read essential information without interruptions. By following the steps outlined below, you can seamlessly configure CookieHub and Google Tag Manager to exclude designated pages from showing the CookieHub dialog.
Please note that this guide assumes you have already set up CookieHub and have basic familiarity with Google Tag Manager. Let’s dive into the steps:
- Log in to Google Tag Manager.
- Click on the “Variables” section on the left.
- Click the New button in “User-Defined variables”
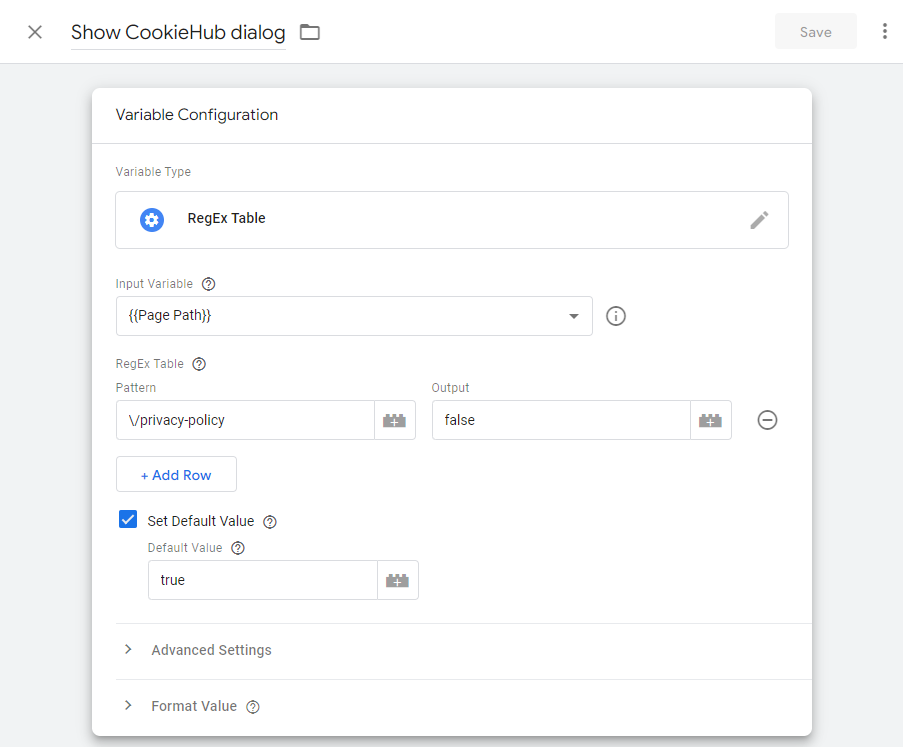
- Choose “RegEx Table “as the variable type
- Select {{Page Path}} as the “Input Variable”.
- In the RegEx Table, add a row and specify the URL pattern that should be excluded (e.g., /privacy-policy). Please note that special characters need to be escaped so put a backward slash in front of any forward slash.
- Set the Output value for the excluded URL pattern to false.
- Check the “Set Default Value” option and set the Default value to true.
- From the “Advanced Settings”, uncheck both “Full Matches Only” and “Enable Capture Groups and Replacement Functionality”.
- Provide a name for the new variable and save it.
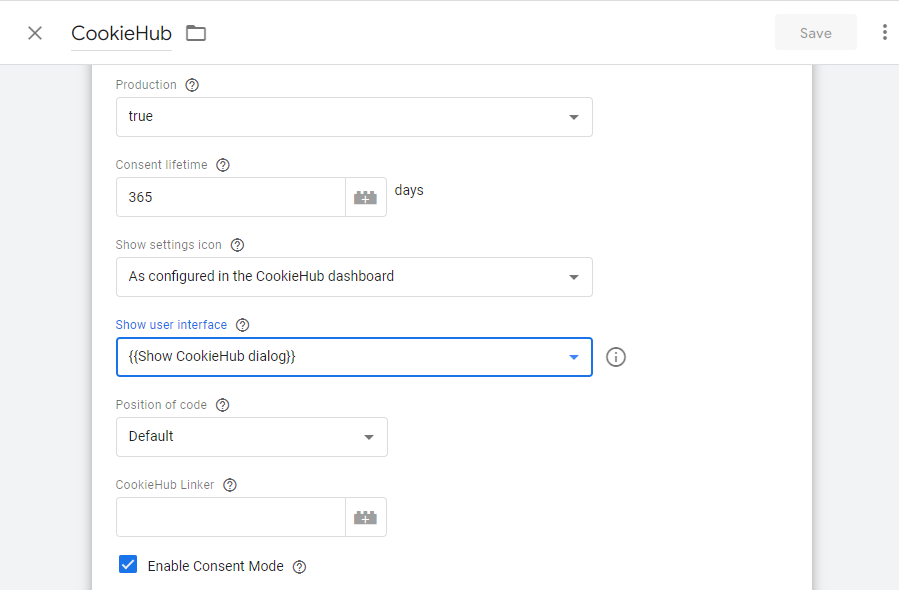
- Go to the “Tags” section and locate the CookieHub tag.
- Click the Edit icon to modify the tag configuration.
- Look for the “Show user interface” field and select the newly created variable from the dropdown list.
- Save the changes to the CookieHub tag.
- Publish the changes in Google Tag Manager to make them live on your website.
Use development/stage mode on non-production domains
CookieHub requires the domain to match the one created in the dashboard to store user choices. When using CookieHub on a different domain, the consent dialog will appear on every page view since the choice isn’t stored. This can be problematic in development and staging environments where a different top-level domain is used. The issue can be easily resolved when implementing CookieHub with Google Tag Manager. You can dynamically populate the “Production” property in the CookieHub tag using a variable that detects the hostname.
Follow these steps to ensure CookieHub operates in production mode only for the designated production domain, while using development mode for other domains:
- Log in to Google Tag Manager.
- Click on the “Variables” section on the left.
- Click the New button in “User-Defined variables”
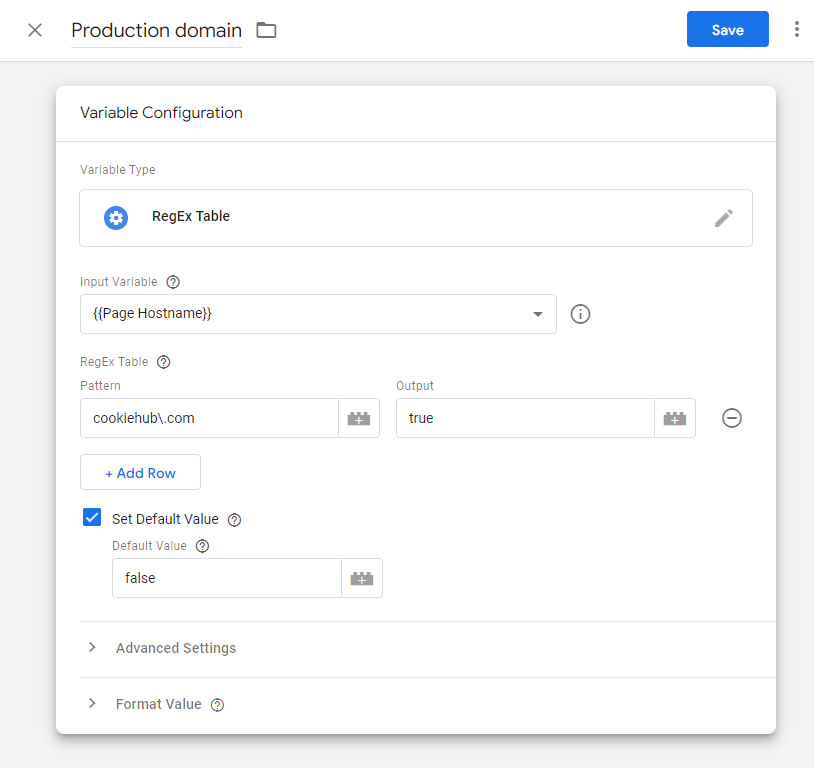
- Choose “RegEx Table “as the variable type
- Select {{Page Hostname}} as the “Input Variable”.
- In the RegEx Table, add a row and specify the production domain (e.g., cookiehub.com). Please note that special characters need to be escaped so put a backward slash in front of dots.
- Set the Output value for the pattern to true.
- Check the “Set Default Value” option and set the Default value to false.
- From the “Advanced Settings”, uncheck both “Full Matches Only” and “Enable Capture Groups and Replacement Functionality”.
- Provide a name for the new variable and save it.
- Go to the “Tags” section and locate the CookieHub tag.
- Click the Edit icon to modify the tag configuration.
- Look for the “Production” field and select the newly created variable from the dropdown list.
- Save the changes to the CookieHub tag.

- Publish the changes in Google Tag Manager to make them live on your website.
Multiple domains using same GTM code
CookieHub requires the domain to match the one created in the dashboard to store user choices. When using the same Google Tag Manager code for multiple top level domains, you’ll have to create all domains in your CookieHub account and adjust the CookieHub GTM tag to use the correct domain code based on the top level domain being viewed.
Follow these steps to create a RegEx Table variable, detecting the domain name and populating the CookieHub domain code accordingly:
- Log in to Google Tag Manager.
- Click on the “Variables” section on the left.
- Click the New button in “User-Defined variables”
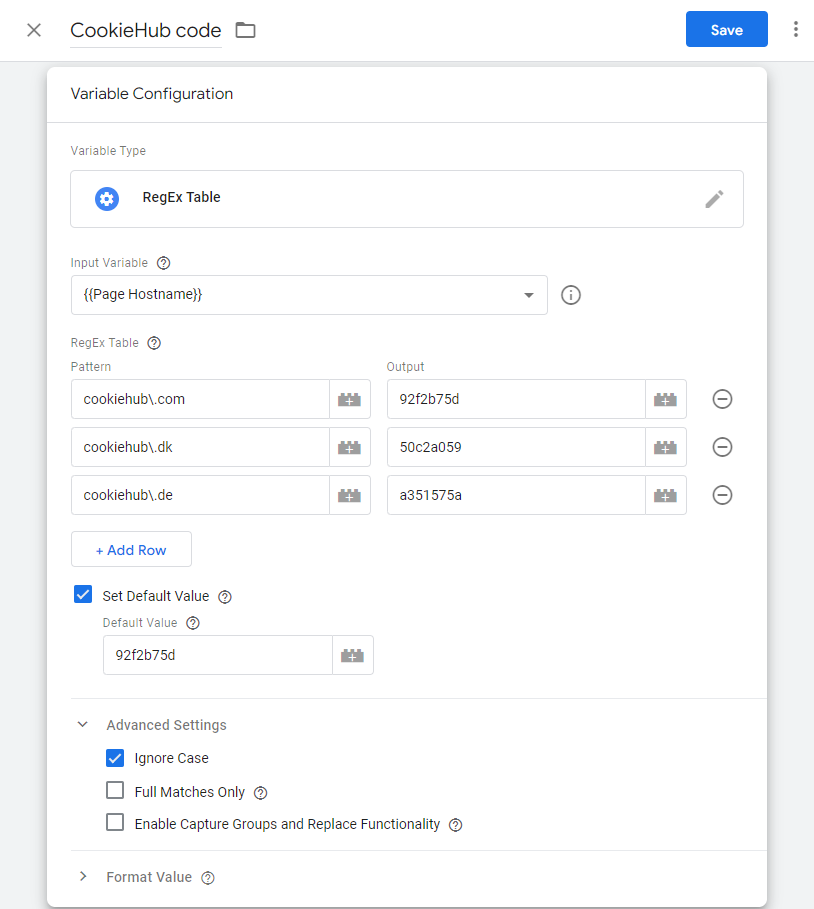
- Choose “RegEx Table “as the variable type
- Select {{Page Hostname}} as the “Input Variable”.
- In the RegEx Table, add rows for all domains and type one top level domain in each row. Please note that special characters need to be escaped so put a backward slash in front of dots.
- Type the domain code for each top level domain as the Output value.
- From the “Advanced Settings”, uncheck both “Full Matches Only” and “Enable Capture Groups and Replacement Functionality”.
- Provide a name for the new variable (ex. CookieHub Code) and save it.
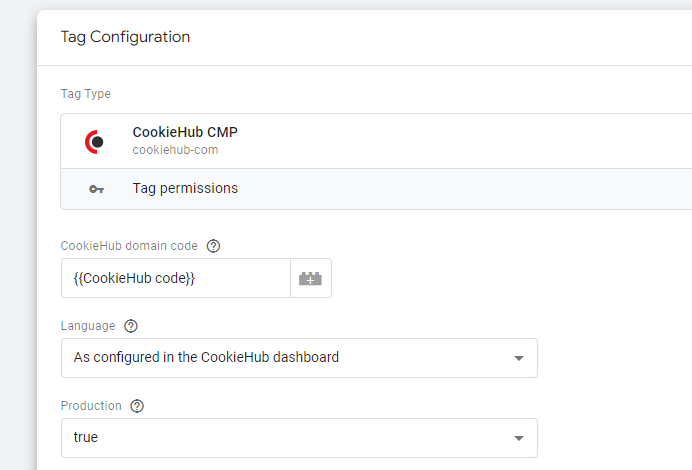
- Go to the “Tags” section and locate the CookieHub tag.
- Click the Edit icon to modify the tag configuration.
- Look for the “CookieHub domain code” field and select the newly created variable from the dropdown list.
- Save the changes to the CookieHub tag.
- Publish the changes in Google Tag Manager to make them live on your website.