HTML tag
If you are currently using Google Tag Manager or Wordpress, we suggest following these guidelines instead: Google Tag Manager or Wordpress plugin
Installation instructions
To implement CookieHub using inline HTML code, follow the steps outlined below:
-
Log in to your account on dash.cookiehub.com.
-
If you have already created a domain, click on it. Otherwise, click the "Add" button and create a new one.
-
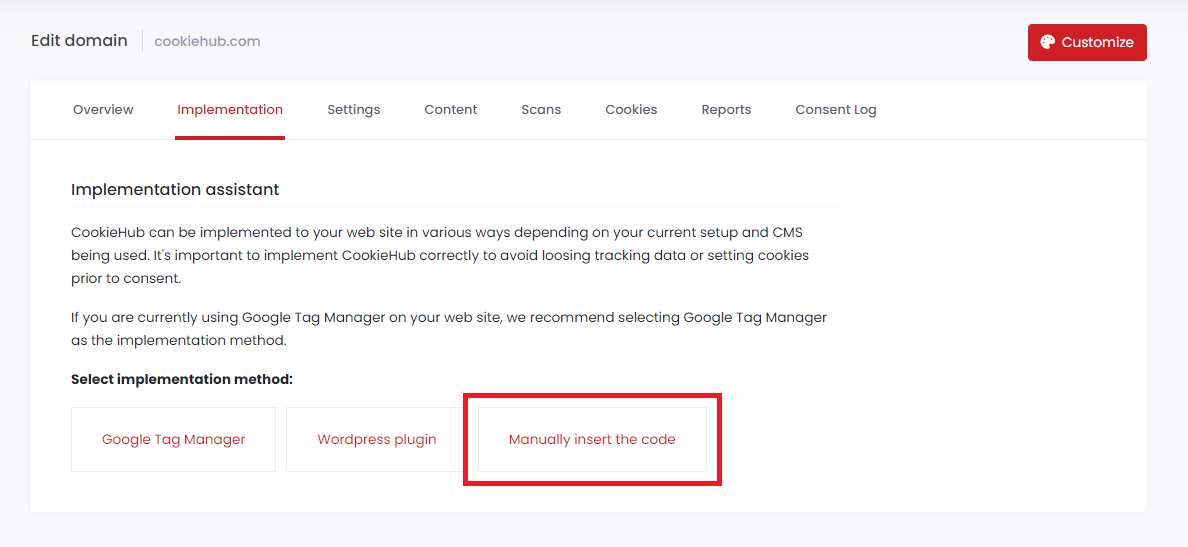
Click on the "Implementation" tab, and then select "Manually insert the code".

-
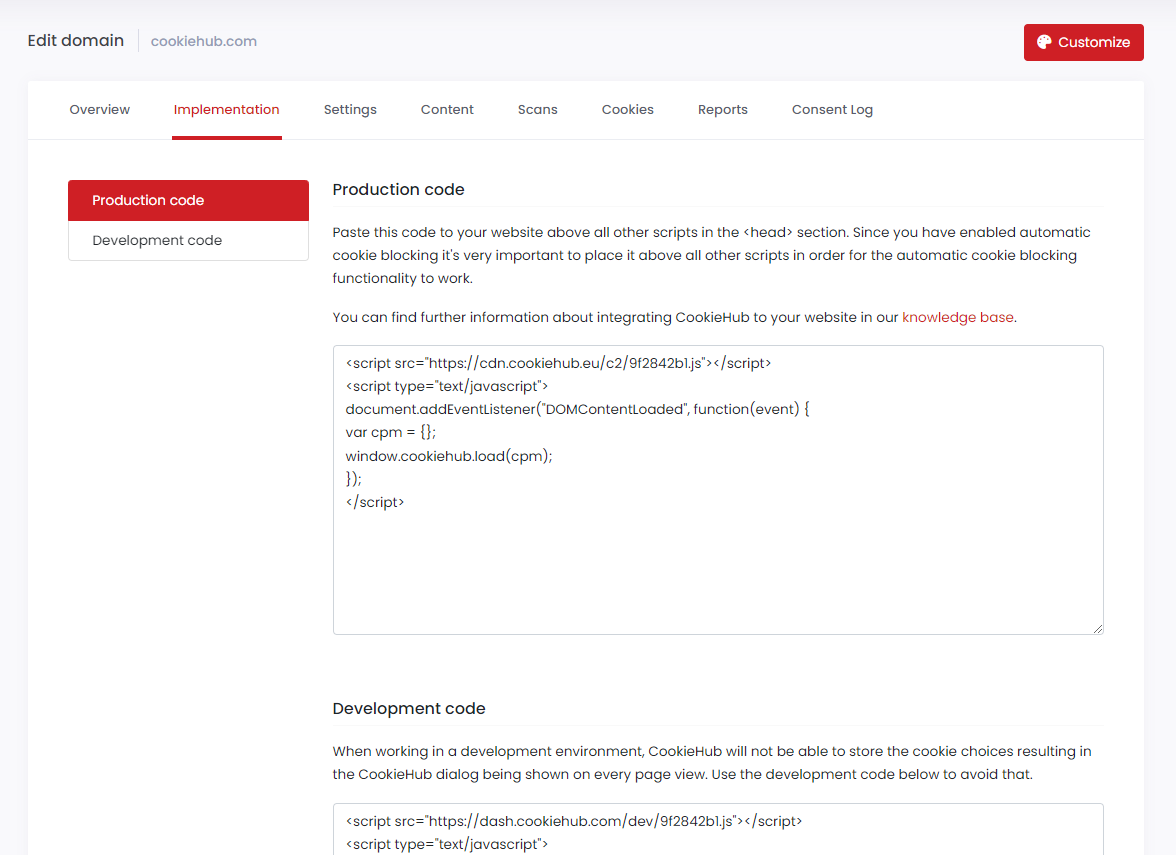
Paste the code to your web site at the top of the <head> tag.

The code may vary depending on the features selected in the "Settings" tab. The code for automatic cookie blocking looks different from the standard implementation code, and when Google consent mode (GCM) is enabled, additional code required by GCM is integrated with the CookieHub code.
Once you have implemented the CookieHub code to your website, the cookie consent dialog will be displayed and the user will be able to allow or deny cookie categories. To respect the user's choices, you will need to adjust tags used for third-party services that set cookies, track users or collect personal information. These services may include web analytics, ad targeting and remarketing services, external form components collecting user data, and embedded components like videos and sharing buttons.
CookieHub can automatically adjust tags for the most commonly used services when the automatic cookie blocker is enabled. For other services, you may need to manually adjust the tags using HTML attributes to delay the loading of the script or content and telling CookieHub which cookie category the tag belongs to.
Code placement
When implementing CookieHub using inline HTML code, it is important to place the code appropriately to ensure that it functions correctly on your website. If you plan to use the automatic cookie blocking feature or consent mode, it is crucial to paste the code to your web site at the top of the <head> tag. By placing it at the top, you allow the CookieHub automatic cookie blocker to prevent tracking scripts from setting cookies before consent is given.
However, if you do not plan to use these features, you can place the code anywhere in the <head> or <body> tags.
How can I insert the code?
It is recommended that you load the CookieHub code on all pages within your website to ensure proper functionality. This can be achieved by placing the code in a common template or shared function. The exact method of implementation may vary depending on the content management system (CMS) used for your website, but in general, most CMSs provide the ability to edit the template or add code to the <head> tag.
Production vs development
For domains with paid subscriptions, there are two different codes available: one for production that should be used for websites that are currently in production, and another for development that will work on any domain, but will show a watermark and should never be used in production environments.
Adjust scripts and tags
When using the "Inline HTML tag" method, make sure to adjust scripts, and iframe tags to ensure that they are not loaded prior to consent. CookieHub can do this automatically for commonly used services when the automatic cookie blocker is enabled. In other cases, you may need to manually adjust the tags using HTML attributes to delay the loading of the script or content and telling CookieHub which cookie category the tag belongs to.
How can I verify setup?
If you have a paid subscription, you can run a cookie scan for your domain to verify that everything is set up correctly. The cookie scan will identify all cookies and detect if they are being set prior to consent or not. After the scan has completed, you'll receive a scan report by email, and you can also view a list of cookies detected and their status in the CookieHub dashboard.
What's next?
Having any problems? Refer to our Troubleshooting guide.