Consent mode v2 signals
Identify Consent mode signals
Using Tag Assistant
If you've integrated CookieHub with Google Tag Manager (GTM) using the provided GTM template, leveraging the Tag Assistant in the GTM Preview mode is an effective way to monitor the consent state communicated by your website. Follow these detailed instructions to use Tag Assistant for reading consent signals:
- Access Google Tag Manager: Log in to your Google Tag Manager dashboard.
- Select Your GTM Container: From the dashboard, click on the GTM container associated with the website you're analyzing.
- Enter Preview Mode: Find and click the Preview button, typically located in the top right corner of the interface. This action opens the GTM Preview mode.
- Navigate to Your Website: In the Preview mode dialog, enter the URL of your website and submit it. Google Tag Manager will open a new tab with your website, where the Tag Assistant will be activated.
- Observe DataLayer Events: With the website open, the Tag Assistant sidebar will display a list of dataLayer events that have been fired during the session. This list provides insights into how your tags are firing and under what conditions.
- Inspect Consent States: To check the consent state associated with any event:
- Click on the specific event in the Tag Assistant sidebar to expand its details.
- Navigate to the Consent tab within the event's details. Here, you'll find a table displaying the consent types (e.g., ad_storage, analytics_storage) and their states (granted or denied).
- Verify consent mode Activation: Ensure that consent types such as ad_user_data and ad_personalization are listed. Their presence indicates that consent mode v2 is active. If these consent types are missing, it may suggest that consent mode v2 is not correctly implemented.

Troubleshooting Tips:
- Ensure CookieHub and GTM are Up-to-Date: If you encounter issues, confirm that you're using CookieHub version 2.7 or later and that the latest GTM template for CookieHub is installed. These steps are crucial for the proper functioning of consent mode v2.
- Check for Implementation Errors: Review your CookieHub and GTM configurations for any mistakes or omissions that might prevent consent mode signals from being correctly processed.
Using Developer Tools
To ensure that your consent mode implementation for Google Analytics is properly configured and actively sending signals, you can utilize the Developer Tools available in most modern web browsers. This verification process involves inspecting network requests to confirm that your website is correctly communicating consent status to Google Analytics. Here's a step-by-step guide:
-
Open Developer Tools: Launch the Developer Tools in your web browser. This is typically done by pressing F12 on your keyboard or right-clicking on the webpage and selecting Inspect or Inspect Element, then navigating to the Developer Tools section.
-
Navigate to the Network Tab: Within the Developer Tools, find and click on the Network tab. This tab allows you to monitor all network requests made by your webpage.
-
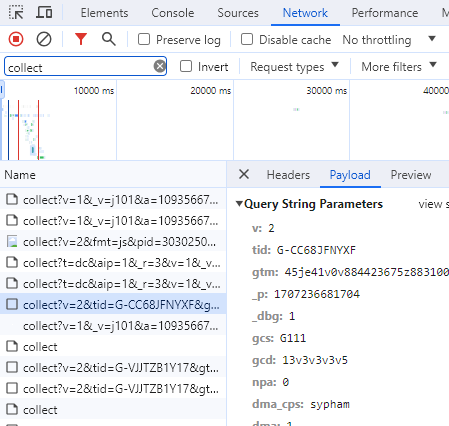
Filter Network Requests: In the filter box (often located at the top of the Network tab), enter "collect" to filter the requests. This is the endpoint that Google Analytics uses for data collection. If no requests appear initially, refresh your webpage while keeping the Developer Tools open to capture incoming network requests.
-
Analyze the Requests: Look through the list of filtered requests. Each item represents a data collection request sent to Google Analytics. Multiple entries might indicate that your site is using multiple Google Analytics properties or sending various types of events.
-
Inspect the Payload: Click on one of the requests to inspect it further. Look for a tab or section named Headers, Payload, or similar, depending on your browser. Within this section, you should locate the gcs (Google Consent State) and gcd (Google Consent Data) parameters. These parameters are crucial as they carry the consent information:
- gcs: Indicates the consent state for ads and analytics cookies.
- gcd: Provides detailed consent information, potentially including additional consented-to services or purposes.
-
Verify Consent Signals: The presence and values of the gcs and gcd parameters confirm that consent information is being passed to Google Analytics. Ensure these values accurately reflect the consent choices made by users on your website.
Reading/decoding the values of the gcs and gcd parameters
gcs - Google Consent Signals
In the original version of consent mode, the network requests include a parameter called gcs, represented in the format G1xy:
- 'x' represents consent to Google Ads cookies and can be either 1 (granted) or 0 (denied).
- 'y' represents consent to Google Analytics cookies and can also be either 1 (granted) or 0 (denied).
Possible values for gcs are as follows:
- G100: No consent has been granted.
- G110: Consent for Google Ads, but not for Google Analytics.
- G101: Consent for Google Analytics, but not for Google Ads.
- G111: Both Google Ads and Google Analytics have consent.
gcd - Google Consent Data
The gcd parameter is included in all hits to Google services, regardless of whether consent mode is active. It encodes values for all four consent signals (ad_storage, analytics_storage, ad_user_data, and ad_personalization) and indicates how the consent signal was generated.
The format of the string is as follows:
1<N><ad_storage><N><analytics_storage><N><ad_user_data><N><ad_personalization>5- The string begins with 1.
- The <N> separate the different consent signals. This number is usually 1 but may be different.
- It ends with a number (typically 5, but sometimes something else) to mark the end.
Possible values for consent signals include:
- 'l': The signal hasn't been set with consent mode.
- 'p': Denied by default (no update).
- 'q': Denied both by default and after an update.
- 't': Granted by default (no update).
- 'r': Denied by default and granted after an update.
- 'm': Denied after an update (no default).
- 'n': Granted after an update (no default).
- 'u': Granted by default and denied after an update.
- 'v': Granted both by default and after an update.
These values represent the consent states for various services, indicating whether they were granted or denied by default and whether there were subsequent updates to the consent status.