Content Management Systems
If you are currently using Google Tag Manager, we suggest following this guideline instead: Google Tag Manager
CookieHub is compatible with various content management systems that support custom HTML code or Google Tag Manager. Below are installation instructions for popular content management systems.
Drupal
Here’s a guide for implementing CookieHub in Drupal:
- Follow the steps 1-4 in the Inline HTML tag section to obtain the CookieHub implementation code.
- Log into your Drupal website and go to the Appearance section.
- Select the theme that you want to add the CookieHub code to and click on the Settings button.
- Click on the Advanced Settings tab.
- Paste the CookieHub integration code into the Header code field.
- Click Save Configuration to save your changes.
That’s it! CookieHub is now implemented and managing third-party tracking scripts automatically on your Drupal website.
Joomla
If you have a Joomla website and want to implement CookieHub to manage your third-party tracking scripts, you can follow these steps:
- Follow the steps 1-4 in the [Inline HTML tag]/installation/tag) section to obtain the CookieHub implementation code.
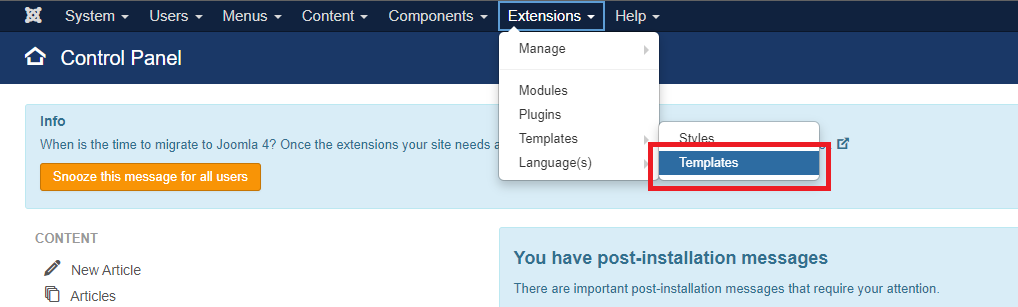
- Log in to your Joomla website Control Panel and navigate to the Templates section.
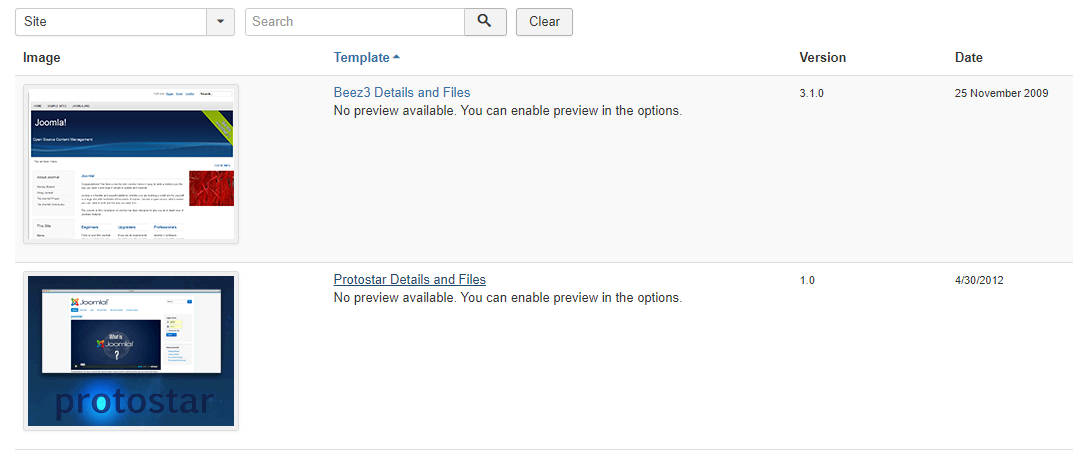
- Select the template that is currently in use.
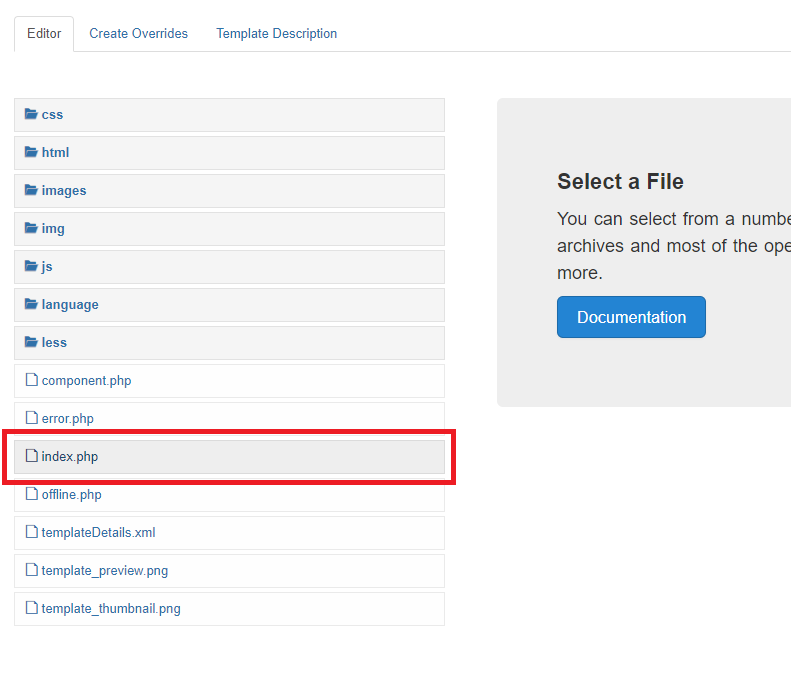
- Navigate to the index.php file and open it.
- Paste the CookieHub integration code immediately after the head tag in the file.
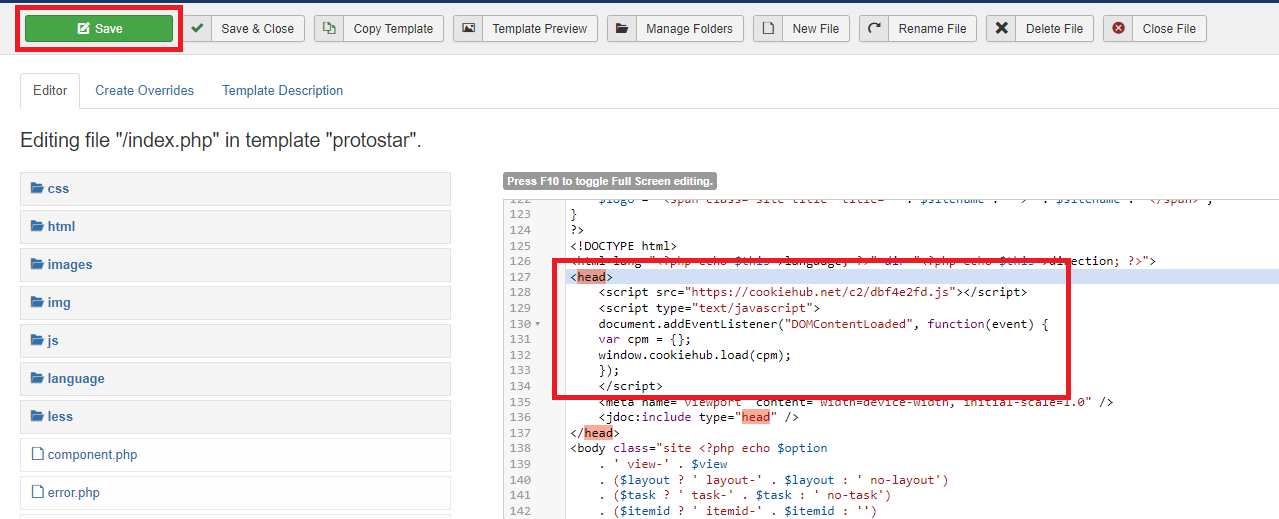
- Save the changes by clicking the Save button located in the top left corner.
With these steps, CookieHub will be implemented and automatically managing third-party tracking scripts.
Magento
If you have a Magento website and want to implement CookieHub to manage your third-party tracking scripts, you can follow these steps:
- Follow the steps 1-4 in the Inline HTML tag section to obtain the CookieHub implementation code.
- Log in to the admin panel of your Magento store.
- From the left-hand menu, navigate to Content > Configuration.
- Select the configuration scope you want to edit (e.g. “Default Store View”).
- Click on the “Edit” button for the theme you want to edit.
- In the “HTML Head” section, find the “Scripts and Style Sheets” field.
- Paste the CookieHub implementation code immediately after the opening head tag.
- Save the configuration changes.
CookieHub is now implemented on your Magento store and will manage third-party tracking scripts automatically.
Shopify
CookieHub seamlessly integrates with Shopify using the Shopify Customer Privacy API to manage cookie consent effectively. To install CookieHub, add the implementation code to your theme and configure Shopify’s privacy settings.
View Shopify installation instructions
Site123
If you have a Site123 website and want to implement CookieHub to manage your third-party tracking scripts, you can follow these steps:
- Follow the steps 1-4 in the Inline HTML tag section to obtain the CookieHub implementation code.
- Log into Your Site123 Account and access your Site123 project dashboard
- In the Website Editor, click Settings and select Plugins from the drop-down list.
- Click the Manage button.
- Click the Add New button to create a new custom code entry.
- Fill in the details in the “Add Custom Code” dialog:
- Name: CookieHub
- Enable: Yes
- Set Code Place: After opening head tag
- Custom Code: Paste your CookieHub implementation code here.
- Click Save.
- Ensure you save your changes and publish your site to apply the new settings.
That’s it! CookieHub is now implemented and managing third-party tracking scripts automatically on your Site123 website.
Squarespace
If you have a Squarespace website and want to implement CookieHub to manage your third-party tracking scripts, you can follow these steps:
Please note that code injection is a premium feature in Squarespace and only available in the Business and Commerce plans.
- Follow the steps 1-4 in the Inline HTML tag section to obtain the CookieHub implementation code.
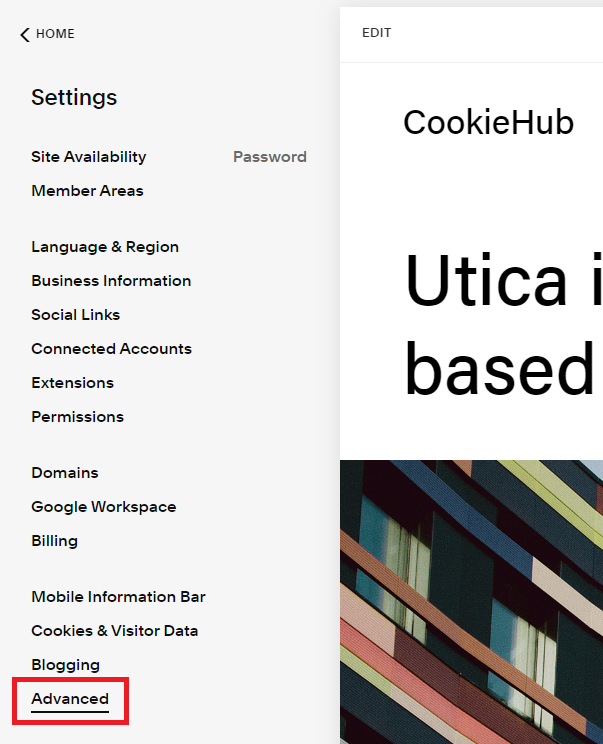
- Log into your Squarespace account and go to the Home Menu.
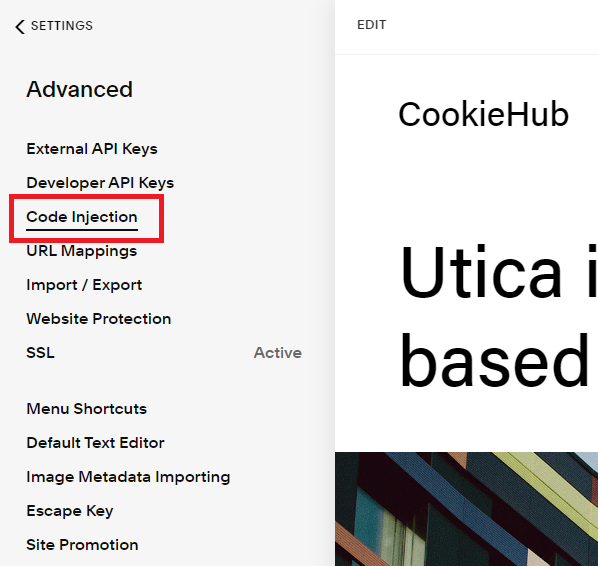
- Click on Settings, and then click on Advanced.
- Click on Code Injection.
- Paste the CookieHub implementation code into the Header section.
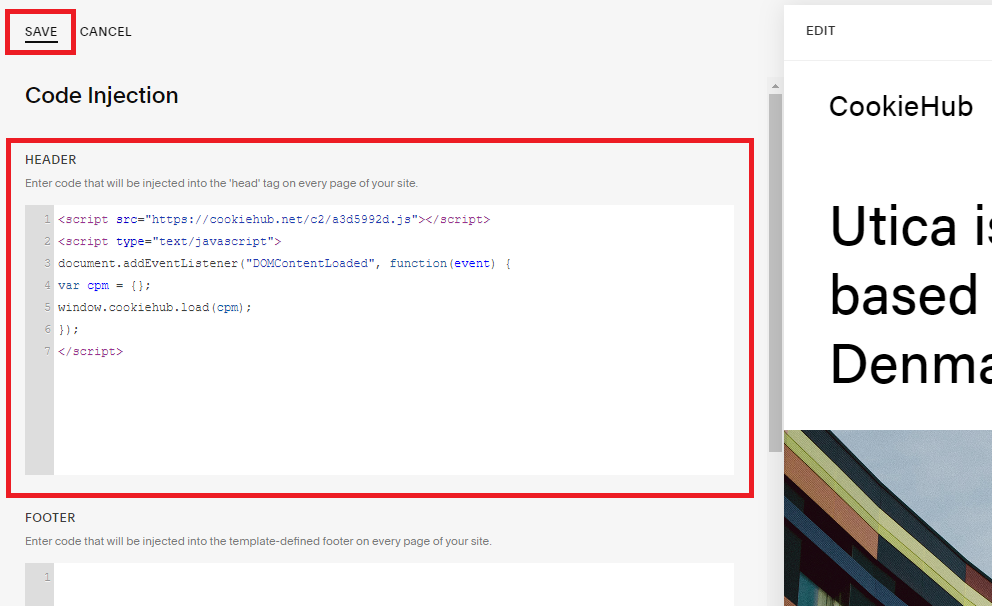
- Click Save.
CookieHub is now implemented on your Squarespace website and is managing third-party tracking scripts automatically.
Umbraco
To implement CookieHub in Umbraco, you will need to add the CookieHub implementation code to your Umbraco website’s template. Once the code is added, CookieHub will take care of managing and blocking third-party tracking scripts until the user has given their consent.
Here’s how to implement CookieHub in Umbraco:
- Follow the steps 1-4 in the Inline HTML tag section to obtain the CookieHub implementation code.
- Log in to your Umbraco website and navigate to the template file that you want to add the CookieHub code to. This is usually located in the /Views folder.
- Open the template file and locate the head tag.
- Paste the CookieHub implementation code right after the head tag.
- Save the changes to the template file.
CookieHub is now implemented and managing third-party tracking scripts automatically. You can customize your consent banner and other CookieHub settings in your CookieHub dashboard.
Webflow
If you have a Webflow website and want to implement CookieHub to manage your third-party tracking scripts, you can follow these steps:
Please note that the custom code feature is only available in the Webflow Pro plan. If you are using a lower plan, you may need to upgrade to be able to add the CookieHub implementation code.
- Follow the steps 1-4 in the Inline HTML tag section to obtain the CookieHub implementation code.
- Log into your Webflow account and go to your project dashboard.
- Click on the Site Settings button in the bottom left corner of the dashboard.
- In the Site Settings panel, click on the Custom Code tab.
- Paste the CookieHub implementation code into the Header Code section.
- Save and publish your changes.
That’s it! CookieHub is now implemented and managing third-party tracking scripts automatically on your Webflow website.
Weebly
If you have a Weebly website and want to implement CookieHub to manage your third-party tracking scripts, you can follow these steps:
- Follow the steps 1-4 in the Inline HTML tag section to obtain the CookieHub implementation code.
- Log in to your Weebly account and navigate to the site you want to add CookieHub to.
- From the top menu, select “Settings” and then “SEO”.
- Scroll down to the “Header Code” section and click on the “Edit SEO Header” button.
- In the “Header Code” field, paste the CookieHub implementation code as described in steps 1-4 of the Inline HTML tag section.
- Click “Save” and then “Publish” to make the changes live.
CookieHub is now implemented and managing third-party tracking scripts automatically on your Weebly site.
Wix
To implement CookieHub in Wix, follow these steps:
- Follow the steps 1-4 in the Inline HTML tag section to obtain the CookieHub implementation code.
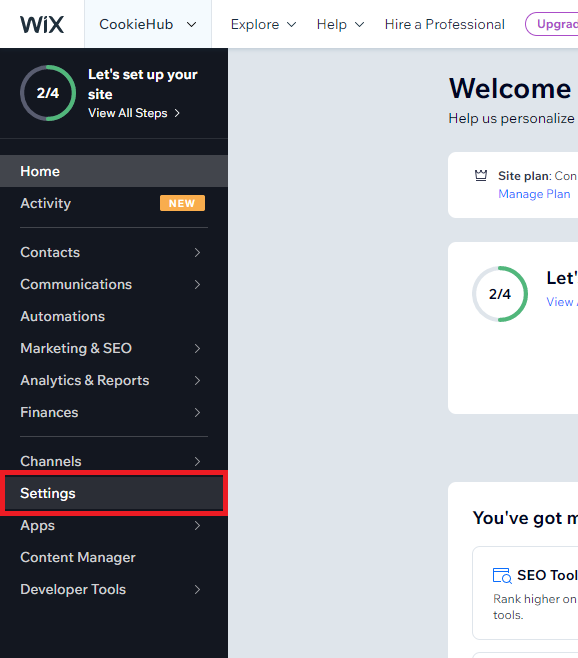
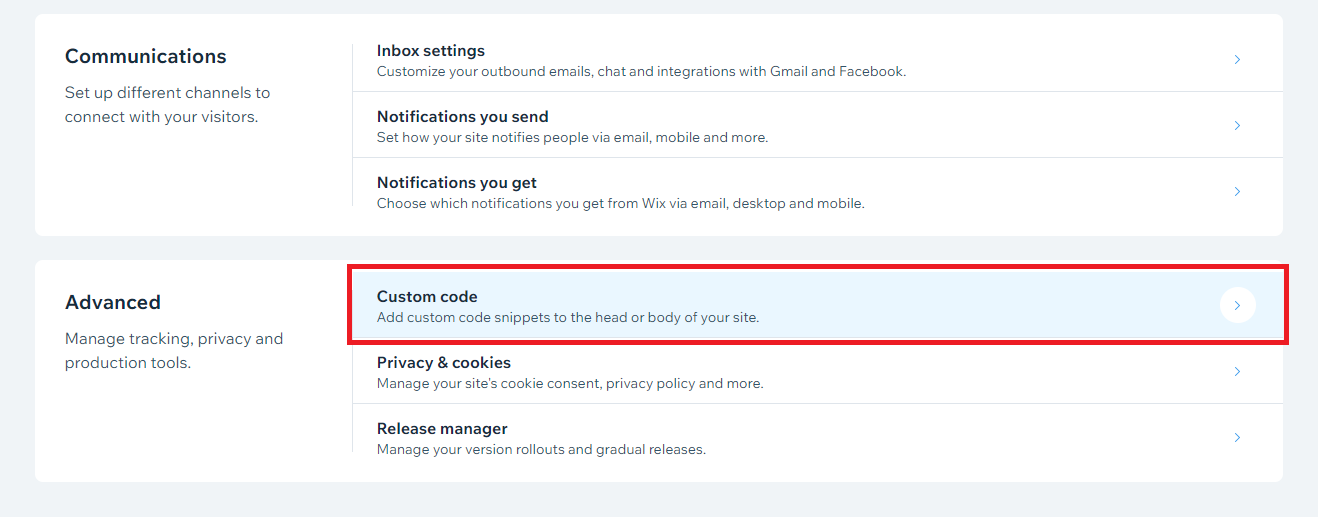
- Log in to your Wix website dashboard and go to Settings.
- Scroll down to the Advanced section and click on Custom Code.
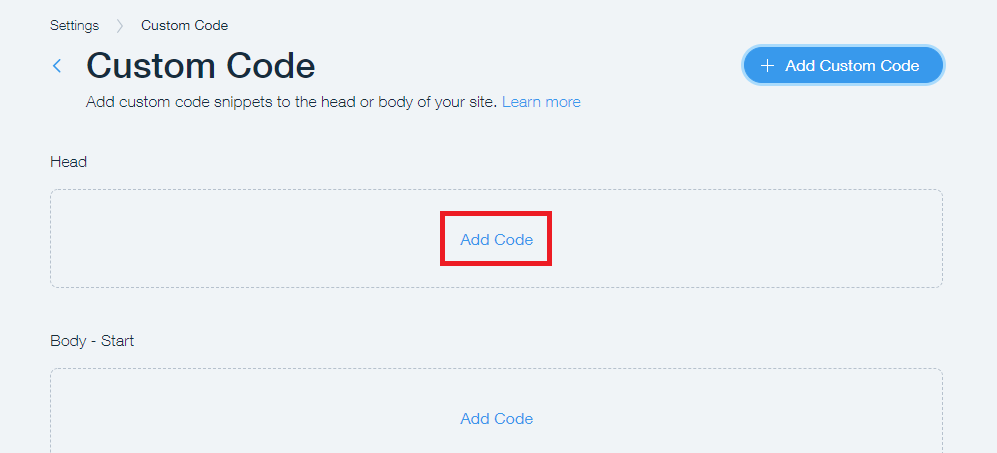
- Click on Add Code in the Head section.
- Paste the CookieHub implementation code into the first field, making sure that it is added to All pages and placed in the Head section.
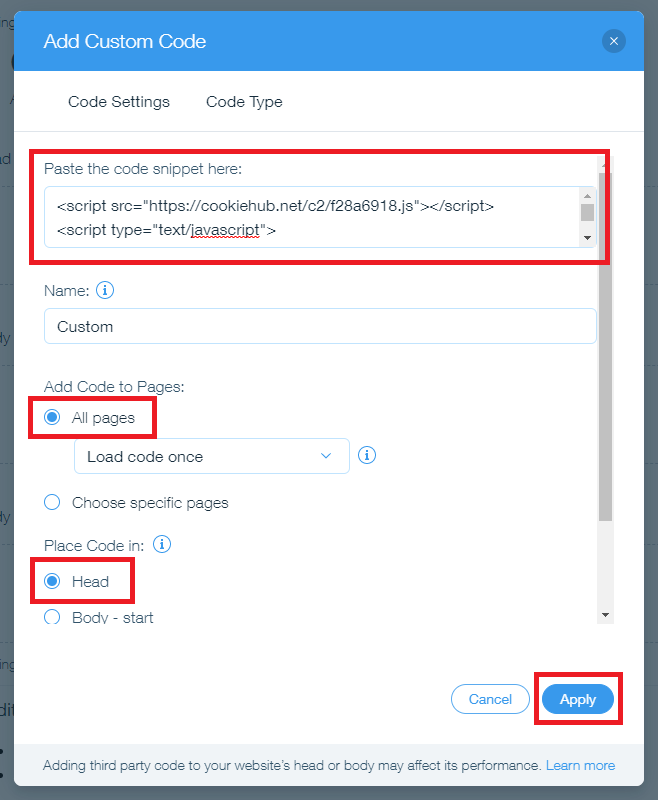
- Click on the Apply button in the bottom right corner to save the changes.
Now, CookieHub is successfully implemented in your Wix website and is managing third-party tracking scripts automatically.
Wordpress
Plugin
To simplify the implementation of CookieHub in your Wordpress website, you can use the CookieHub Wordpress plugin available in the Wordpress plugin repository. This plugin allows for an easier setup process and direct integration with your CookieHub account and domain. Here’s how to install and configure the plugin:
Install the CookieHub Wordpress plugin:
- Log in to the Wordpress admin for your website
- Click the Plugins link in the left menu
- Click the Add New button at the top
- Search for “CookieHub” and click “Install Now”
- Activate the plugin by clicking the “Activate” button
- Configure the CookieHub GDPR plugin for Wordpress:
After installing the CookieHub plugin, you need to link it to your CookieHub account/domain. Here’s how to configure the plugin:
- Click the “CookieHub” item in the left menu under Plugins
- Enter your domain code in the “Code” field and select the “Automatic cookie blocking” option (if you have already activated automatic cookie blocking for your domain).
- Scroll down and save the changes.
CookieHub is now implemented on your WordPress website and is managing third-party tracking scripts automatically. Note that if you’re using a caching plugin or service, you may need to clear the cache to see the changes take effect.
Manual implementation
If you prefer to set up CookieHub manually, follow the steps below:
- Follow the steps 1-4 in the Inline HTML tag section to obtain the CookieHub implementation code.
- Log in to your WordPress dashboard and select Appearance in the left-hand menu.
- Click on Theme Editor.
- Find the header.php file in the list of theme files on the right-hand side and click on it to open it.
- Paste the CookieHub implementation code right below the opening head tag.
- Click the Update File button to save the changes.